Blender 2.49 Scripting Pdf Download
Chapter 1. Extending Blender with Python
Before we start crafting scripts in Blender we must check whether or not we have all the necessary tools available. After that we will have to familiarize ourselves with these tools so that we can use them with confidence. In this chapter, we will look at:
-
What can and cannot be accomplished with Python in Blender
-
How to install a full Python distribution
-
How to use the built-in editor
-
How to run a Python script
-
How to explore built-in modules
-
How to write a simple script that adds an object to a Blender scene
-
How to register a script in the Blender scripts menu
-
How to document your script in a user-friendly way
-
How to distribute a script
With so many things possible there is an awful lot to learn, but fortunately the learning curve is not as steep as it might seem. Let's just type in a quick few lines of Python to put a simple object into our Blender scene, just to prove we can, before we head into deeper waters.
-
Start Blender with an empty scene.

-
Open the interactive Python console (refer to the preceding screenshot to see where to find it).
-
Type in the following lines (end each one with a Enter / Return ).
mesh = Mesh.Primitives.Monkey() Scene.GetCurrent().objects.new(mesh,'Suzanne') Window.RedrawAll()
Voila! That's all that is needed to add Suzanne, Blender's famous mascot, to the scene.

The Blender API
Almost anything in Blender is accessible from Python scripts but there are some exceptions and limitations. In this section, we illustrate what this means exactly and which notable features are not accessible to Python (for example, fluid dynamics).
The Blender API consists of three major areas of interest:
-
Access to Blender objects and their properties, for example a
Cameraobject and itsangleproperty or aSceneobject and itsobjectsproperty -
Access to operations to perform, for example adding a new
Cameraor rendering an image -
Access to the graphical user interface, either by using simple building blocks or by interacting with the Blender event system
There are also some utilities that do not fit well in any of these categories as they concern themselves with abstractions that have no direct relation to Blender objects as seen by the end user, for example functions to manipulate vectors and matrices.
A lot of power
Taken together this means we can achieve a lot of things from Python scripts. We can:
-
Create a new Blender object of any type, including cameras, lamps, meshes, and even scenes
-
Interact with the user with a graphical user interface
-
Automate common tasks within Blender such as rendering
-
Automate maintenance tasks outside of Blender such as cleaning up directories
-
Manipulate any property of a Blender object that is exposed by the API
That last statement shows one of the current weaknesses of the Blender API: any object property that the developers add in the Blender C source must be provided separately in the Python API. There is no automatic conversion from internal structures to the interface available in Python and this means that efforts must be duplicated and may lead to omitted functionality. For instance, in Blender 2.49 it is not possible at all to set up a fluid simulation from a script. Although it is possible to set up a particle system, there is no way to set the behavioral characteristics of a boids particle system.
Another problem of the 2.49 Python API is that many of the actions a user may choose to perform on an object have no equivalent in the API. Setting simple parameters such as the camera angle or performing a rotation of any object is easy and even associating for example, a subsurface modifier to a mesh is just a few lines of code but common actions, especially on mesh objects, such as subdividing selected edges or extruding faces are missing from the API and must be implemented by the script developer.
These problems led the Blender developers to completely redesign the Blender Python API for the 2.5 version, focusing on feature parity (that is, everything possible in Blender should be possible using the Python API). This means that in many situations it will be far easier to get the same results in Blender 2.5.
Finally, Python is used in more places than just standalone scripts: PyDrivers and PyConstraints enable us to control the way Blender objects behave and we will encounter them in later chapters. Python also allows us to write custom textures and shaders as part of the nodes system as we will see in Chapter 7, Creating Custom Shaders and Textures.
Also, it is important to keep in mind that Python offers us far more than just the (already impressive) tools to automate all sorts of tasks in Blender. Python is a general programming language with an extensive library of tools included, so we do not have to resort to external tools for common system tasks such as copying files or archiving (zipping) directories. Even networking tasks can be implemented quite easily as a number of render farm solutions prove.
Some batteries included
When we install Blender, a Python interpreter is already part of the application. This means that it is not necessary to install Python as a separate application. But there is more to Python than just the interpreter. Python comes with a huge collection of modules that provide a wealth of functionality. Anything from file manipulation to XML processing and more is available, and the best bit is that these modules are a standard part of the language. They are just as well maintained as the Python interpreter itself and (with very few exceptions) available on any platform that Python runs on.
The downside is, of course, that this collection of modules is fairly large (40MB or so), so the Blender developers chose to distribute only the bare minimum, primarily the math module. This makes sense if you want to keep the size of the Blender downloads manageable. Many Python developers have come to depend on the standard distribution because not having to reinvent the wheel saves huge amounts of time, not to mention it's not an easy task to develop and test a full-fledged XML library say, just because you want to be able to read a simple XML file. That is why it is now more or less a consensus that it is a good thing to install the full Python distribution. Fortunately, the installation is just as easy as the installation of Blender itself, even for end users, as binary installers are provided for many platforms, such as Windows and Mac, also in 64-bit versions. (Distributions for Linux are provided as source code with instructions on how to compile them, but many Linux distributions either already provide Python automatically or make it very easy to install it afterwards from a package repository).
Check for a full Python distribution
Chances are that you already have a full Python distribution on your system. You can verify this by starting Blender and checking the console window (the term console window refers to either the DOSBox that starts in parallel on Windows or the X terminal window where you start Blender from on other systems) to see if it displays the following text:
Compiled with Python version 2.6.2. Checking for installed Python... got it!
If it does, then there is nothing you have to do and you can skip to The interactive Python console section. If it shows the following message then you do have to take some action:
Compiled with Python version 2.6.2. Checking for installed Python... No installed Python found. Only built-in modules are available. Some scripts may not run. Continuing happily.
Installing a full Python distribution
The steps toward a full Python installation for Windows or Mac are as follows:
-
Download a suitable installer from http://www.python.org/download/. At the moment of writing, the latest stable 2.6 version is 2.6.2 (used in Blender 2.49). It is generally a good thing to install the latest stable version as it will contain the latest bug fixes. Make sure, however, to use the same major version as Blender is compiled with. It is fine to use version 2.6.3 when it is released even as Blender is compiled with version 2.6.2. But if you use an older version of Blender that is compiled with Python 2.5.4 you have to install the latest Python 2.5.x release (or upgrade to Blender 2.49, if that is an option).
-
Run the installer: On Windows the installer offers you to choose where to install Python. You can choose anything you like here, but if you choose the default, Blender will almost certainly find the modules installed here without the need to set the
PYTHONPATHvariable. (see below) -
(Re) start Blender. The Blender console should show the text:
Compiled with Python version 2.6.2. Checking for installed Python... got it!
If it doesn't, it might be necessary to set the
PYTHONPATHvariable. Refer to the Blender wiki for detailed information: http://wiki.blender.org/index.php/Doc:Manual/Extensions/Python
On Ubuntu Linux, the first step is not needed and installing can be done by using the built-in package manager:
sudo apt-get update sudo apt-get install python2.6
Other distributions might use a different package management system so you might have to check the documentation for that. Under Windows it might be necessary to set the PYTHONPATH environment variable, although this is unlikely when using the provided packages.
The interactive Python console
To see where Blender actually looks for modules you may look at Python's sys.path variable. To do this you have to start up Blender's interactive Python console. Note that you use a different and possibly confusing notion of console here—the DOSBox or the terminal window that is started alongside Blender's main application window and where various informational messages are displayed is referred to as console as well! The Python interactive console that we want to use now is started from the script window :

Once the interactive Python console is started, type the following commands:
import sys print sys.path
Note that the interactive Python console does not show any prompt (unless when expecting indentation, for example within a for loop) but anything you type will be in a different color (white on black by default) from what is returned (that will be blue or black). The two preceding commands will give us access to Python's sys module that contains various variables with system information. The sys.path variable that we print here will hold all of the directories that will be searched when we try to import a module. (Note that importing sys will always work because sys is a built-in module.) The output will be something similar to:
['C:\\Program Files\\Blender Foundation\\Blender', 'C:\\Program Files\\Blender Foundation\\Blender\\python26.zip', 'C:\\Python26\\Lib', 'C:\\Python26\\DLLs', 'C:\\Python26\\Lib\\lib-tk', 'C:\\Program Files\\Blender Foundation\\Blender', 'C:\\Python26', 'C:\\Python26\\lib\\site-packages','C:\\Python26\\lib\\site-packages\\PIL', 'C:\\PROGRA~1\\BLENDE~1\\Blender', 'C:\\Documents and Settings\\Michel\\Application Data\\Blender Foundation\\Blender\\.blender\\scripts', 'C:\\Documents and Settings\\Michel\\Application Data\\Blender Foundation\\Blender\\.blender\\scripts\\bpymodules']
If your Python installation directory is not in this list then you should set the PYTHONPATH variable before starting Blender.
Exploring built-in modules, the help() function
The interactive Python console is a good platform to explore built-in modules as well. Because Python comes equipped with two very useful functions, help() and dir(), you have instant access to a lot of information contained in Blender's (and Python's) modules as a lot of documentation is provided as part of the code.
For people not familiar with these functions, here are two short examples, both run from the interactive Python console. To get information on a specific object or function, type:
The information will be printed in the same console:
Help on built-in function Get in module Blender.Lamp: Lamp.Get (name = None): Return the Lamp Data with the given name, None if not found, or Return a list with all Lamp Data objects in the current scene, if no argument was given.
The help() function will show the associated docstring of functions, classes, or modules. In the previous example, that is the information provided with the Get() method (function) of the Lamp class. A docstring is the first string defined in a function, class, or module. When defining your own functions, it is a good thing to do this as well. This might look like this:
def square(x): """ calculate the square of x. """ return x*x
We can now apply the help function to our newly-defined function like we did before:
The output then shows:
Help on function square in module __main__: square(x) calculate the square of x.
In the programs that we will be developing, we will use this method of documenting where appropriate.
Exploring built-in functions, the dir() function
The dir() function lists all members of an object. That object can be an instance, but also a class or module. For example, we might apply it to the Blender.Lamp module:
The output will be a list of all members of the Blender.Lamp module. You can spot the Get() function that we encountered earlier:
['ENERGY', 'Falloffs', 'Get', 'Modes', 'New', 'OFFSET', 'RGB','SIZE', 'SPOTSIZE', 'Types', '__doc__', '__name__', '__package__','get']
Once you know which members a class or module has, you can then check for any additional help information for these members by applying the help() function.
Of course both dir() and help() are most useful when you already have some clue where to look for information. But if so, they can be very convenient tools indeed.
Getting familiar with the built-in editor
It is possible to use any editor (that you like) to write Python scripts and then import the scripts as text files but Blender's built-in text editor will probably be adequate for all programming needs. It features conveniences such as syntax highlighting, line numbering, and automatic indentation, and gives you the possibility to run a script directly from the editor. The ability to run a script directly from the editor is a definite boon when debugging because of the direct feedback that you get when encountering an error. You will not only get an informative message but the offending line will also be highlighted in the editor.
What is more, the editor comes with many plug-ins of which the automatic suggestion of members and the documentation viewer are very convenient for programmers. And of course, it is possible to write additional plug-ins yourself.
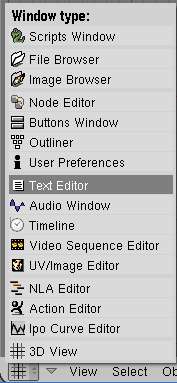
You can select the built-in editor by choosing Text Editor from the Windows menu:
When you start up you are presented with an almost empty area except for a strip of buttons at the bottom:

We can select the default empty text buffer TX:Text or create a new empty text by selecting ADD NEW from the drop-down menu available when we click on the Menu button.
The default name for this new text will be TX:Text.001, but you may change it to something more meaningful by clicking on the name and changing it. Note that if you would like to save this text to an external file (with Text | Save As... ) the name of the text is distinct from the filename (although in general it is a good idea to keep these the same to avoid confusion). It is not mandatory to save texts as external files; texts are Blender objects that are saved together with all other information when you save your .blend file.
External files may be opened as texts by selecting OPEN NEW from the Menu button drop-down instead of ADD NEW . If for some reason an external file and an associated text are out of sync when Blender is started, an out of sync button is displayed. When clicked, it displays a number of options to resolve the issue.
Once a new or existing text is selected, the menu bar at the bottom of the screen is updated with some additional menu options:

The Text file menu gives access to options to open or save a file or to run the script in the editor. It also presents a number of template scripts that may be used as a basis for your own scripts. If you select one of these templates a new text buffer is created with a copy of the selected template.
The Edit menu contains cut-and-paste functionality as well as options to search and replace text or jump to a chosen line number.
The Format menu has options to indent and unindent selected text as well as options to convert whitespace. The latter option can be very helpful when the Python interpreter complains about unexpected indentation levels although there seems nothing amiss with your file. If that happens you possibly have mixed tabs and spaces in way that confuse Python (as they are different as far as the interpreter is concerned) and a possible way out is to convert selected text to spaces first and then back to tabs. This way mixed spaces and tabs will be used in a uniform way again.
An editor example
To get used to the editor, create a new text buffer by choosing Text | New and type in the following example lines:
import sys print sys.path
Most keys on the keyboard will behave in a familiar way, including Delete , Backspace , and Enter . The shortcut keys for cutting, pasting, and copying are listed in the Edit menu as Alt + X , Alt + V , and Alt + C respectively but the Ctrl key equivalents Ctrl + X , Ctrl + V , and Ctrl + C (familiar to Windows users) work just as well. A full keyboard map can be consulted on the Blender wiki, http://wiki.blender.org/index.php/Doc:Manual/Extensions/Python/Text_editor
Selecting portions of the text can be achieved by clicking and dragging the mouse, but you can also select text by moving the text cursor around while pressing the Shift key.
Text will be uncolored by default, but reading scripts can be made a lot easier on the eye by enabling syntax highlighting. Clicking on the little AB button will toggle this (it will be black and white when syntax highlighting is off and colored when on.) Like many aspects of Blender, text colors can be customized in the themes section of the User Preferences window.
Another feature that is very convenient to enable, especially when debugging scripts, is line numbering. (You might write a faultless code in one go, but unfortunately yours truly is less of a genius.) Every Python error message that will be shown will have a filename and a line number, and the offending line will be highlighted. But the lines of the calling function(s), if any, will not be highlighted although their line numbers will be shown in the error message, so having line numbers enabled will enable you to quickly locate the calling context of the trouble spot. Line numbering is enabled by clicking on the lines button.
Running a script is done by pressing Alt + P . Nothing is displayed in the editor when there are no errors encountered, but the output will be shown on the console (that is, the DOSBox or X terminal Blender started from, not the Python interactive console that we encountered earlier).
First steps: Hello world
Tradition demands every book about programming to have a "hello world" example and why would we offend people? We will implement, and run, a simple object instantiating script and show how to integrate this in Blender's script menu. We will also show how to document it and make an entry in the help system. Finally, we will spend some words on the pros and cons of distributing scripts as .blend files or as scripts to install in the scriptdir by the user.
Let's write some code! You can type in the following lines directly into the interactive Python console, or you can open a new text in Blender's text editor and then press Alt + P to run the script. It is a short script but we'll go through it in some detail as it features many of the key aspects of the Blender Python API.
#!BPY import Blender from Blender import Scene, Text3d, Window hello = Text3d.New("HelloWorld") hello.setText("Hello World!") scn = Scene.GetCurrent() ob = scn.objects.new(hello) Window.RedrawAll() The first line identifies this script as a Blender script. This is not necessary to run the script, but if we want to be able to make this script a part of Blender's menu structure we need it, so we better get used to it right away.
You will find the second line (which is highlighted) in virtually any Blender script because it gives us access to the classes and functions of the Blender Python API. Likewise, the third line gives us access to the specific submodules of the Blender module that we will need in this script. We could access them as members of the Blender module of course (for example, Blender.Scene), but importing them explicitly saves some typing and enhances readability.
The next two lines first create a Text3d object and assign that to the variable hello. The Text3d object will have the name HelloWorld in Blender so users can refer to this object by this name. Also this is the name that will be visible in the Outliner window and in the lower-left corner if the object is selected. If there already exists an object of the same type with this name, Blender adds a numerical suffix to the name to make it unique. For example, HelloWorld might become HelloWord.001 if we run the scripts twice.
By default, a newly created Text3d object will contain the text Text so we change that to Hello World! with setText() method.
A newly created Blender object is not visible by default, we have to associate that with a Scene so the next few lines retrieve a reference to the current scene and add the Text3d object to it. The Text3d object is not added directly to the scene but the scene.objects.new() method embeds the Text3d object in a generic Blender object and returns a reference to the latter. The generic Blender object holds information common to all objects, such as position, whereas the Text3d object holds specific information, such as the text font.
Finally, we tell the window manager to refresh any window that needs a refresh due to the addition of a new object.
Integrating a script in Blender's menus
Your own script doesn't have to be a second class citizen. It can be made part of Blender on par with any of the bundled scripts that come with Blender. It can be added to the Add menu present in the header at the top of the View3D window.
Note
Actually, the Add menu is present in the header at the bottom of the user preferences window but as this window is situated above the View3D window, and is by default minimized to just the header, it looks as if it's a header at the top of the View3D window. Many users are so accustomed to it that they see it as part of the View3D window.
It may supply information to Blender's help system just like any other script. The following few lines of code make that possible:
""" Name: 'HelloWorld' Blender: 249 Group: 'AddMesh' Tip: 'Create a Hello World text object' """
We start the script with a standalone string containing several lines.
Note
Each line starts with a label followed by a colon and a value. The colon should follow the label immediately. There should not be any intervening space, otherwise our script will not show up in any menu.
The labels at the beginning of each line serve the following purpose:
-
Name(a string) defines the name of the scripts as it appears in the menu -
Blender(a number) defines the minimum version of Blender needed to use the script -
Group(a string) is the submenu of the scripts menu under which this script should be groupedIf our scripts are to appear under the Add | Mesh menu in the View3D window (also accessible by pressing Space ) this should read
AddMesh. If it should be under a different submenu of the script's menu, it could read, for example,WizardsorObject. Besides the necessary labels the following optional labels might be added:
-
Version(a string) is the version of the script in any format you like. -
Tip(a string) is the information shown in the tooltip when hovering over the menu item in the Scripts menu. If the script belongs to the groupAddMesh, no tooltip will be shown even if we define one here.

Integrating a script in Blender's help system
Blender has an integrated help system that is accessible from the Help menu at the top of the screen. It gives access to online resources and to information on registered scripts via the Scripts Help Browser entry. Once selected, it shows a collection of drop-down menus, one for each group, where you can select a script and view its help information.
If we want to enter our script in the integrated help system we need to define some additional global variables:
__author__ = "Michel Anders (varkenvarken)" __version__ = "1.00 2009/08/01" __copyright__ = "(c) 2009" __url__ = ["author's site, http://www.swineworld.org"] __doc__ = """ A simple script to add a Blender Text object to a scene. It takes no parameters and initializes the object to contain the text 'Hello World' """
These variables should be self-explanatory except for the __url__ variable—this one will take a list of strings where each string consists of a short description, a comma, and a URL. The resulting help screen will look like this:

Now all that we have left to do is to test it and then place this script in an appropriate location. We can test the script by pressing Alt + P . If no errors are encountered, this will result in our Hello World Text3d object being added to the scene but the script will not be appended to the Add menu yet.
If a script is to be added to the Add menu it has to reside in Blender's script directory. To do this, first save the script in the text buffer to a file with a meaningful name. Next, make sure that this file is located in Blender's script directory. This directory is called scripts and is a subdirectory of .blender, Blender's configuration directory. It is either located in Blender's installation directory or (on Windows) in the Application Data directory. The easiest way to find ours is to simply look at the sys.path variable again to see which listed directory ends in .blender\scripts.
Scripts located in Blender's scripts directory will be automatically executed on startup, so our hello world script will be available anytime we start up Blender. If we want Blender to reexamine the script directory (so that we don't have to restart Blender to see our new addition) we can choose Scripts | Update menus in the interactive console.
Don't get confused, stay objective
As you may have noticed the word object is used in two different (possibly confusing) ways. In Blender almost anything is referred to as an Object. A Lamp for instance is an Object, but so is a Cube or a Camera. Objects are things that can be manipulated by the user and have for example a position and a rotation.
In fact, things are a little bit more structured (or complicated, as some people say): any Blender object contains a reference to a more specific object called the data block . When you add a Cube object to an empty scene you will have a generic object at some location. That object will be called Cube and will contain a reference to another object, a Mesh. This Mesh object is called Cube by default as well but this is fine as the namespaces of different kind of objects are separate.
This separation of properties common to all objects (such as position) and properties specific to a single type of object (such as the energy of a Lamp or the vertices of a Mesh) is a logical way to order sets of properties. It also allows for the instantiation of many copies of an object without consuming a lot of memory; we can have more than one object that points to the same Mesh object for example. (The way to achieve that is to create a linked duplicate , using Alt + D .) The following diagram might help to grasp the concept:

Another way the word object is used is in the Python sense. Here we mean an instance of a class. The Blender API is object-oriented and almost every conceivable piece of structured data is represented by an object instanced from a class. Even fairly abstract concepts such as an Action or an IPO (abstract in the sense that they do not have a position somewhere in your scene) are defined as classes.
How we refer to the Blender or to the Python sense of the word object in this book will mostly be obvious from the context if you keep in mind this distinction. But if not, we tend to write the Blender sense as Object and the Python sense as object or object instance .
Adding different types of object from a script
Adding other types of objects is, in many cases, just as straightforward as adding our text object. If we want our scene to be populated in a way that enabled us to render it, we would have to add a camera and a lamp to make things visible. Adding a camera to the same scene could be done like this (assuming we still have a reference to our active scene in the scn variable):
from Blender import Camera cam = Camera.New() # creates new camera data ob = scn.objects.new(cam) # adds a new camera object scn.setCurrentCamera(ob) # makes this camera active
Note that the Camera object is again different from the actual camera data. A Camera object holds camera-specific data, such as viewing angle, and a Blender object holds data common to all objects, notably its position and rotation. We will encounter cameras again later and see how we can point them and set the view angle.
Lamps follow pretty much the same pattern:
from Blender import Lamp lamp = Lamp.New() # create a new lamp ob = scn.objects.new(lamp)
Again, the Lamp object holds lamp-specific data such as its type (for example, spot or area ) or its energy while the Blender object that encapsulates it defines its position and rotation.
This pattern is similar for a Mesh object but the situation is subtly different here because a mesh is a conglomerate of vertices, edges, and faces among other properties.
Adding a mesh object
Like a Lamp or a Camera, a Mesh is a Blender object that encapsulates another object in this case, a Blender.Mesh object. But unlike Blender.Lamp or Blender.Camera objects it does not stop there. A Blender.Mesh object itself may contain many other objects. These objects are vertices, edges, and faces. Each of these may have a number of associated properties. They may be selected or hidden and may have a surface normal or an associated UV-texture.
Beside's any associated properties, a single vertex is basically a point in 3D space. In a Blender.Mesh object any number of vertices are organized in a list of Blender.Mesh.MVert objects. Given a Mesh object me, this list may be accessed as me.verts. An edge is a line connecting two vertices in Blender represented by a Blender.Mesh.MEdge object. Its main properties are v1 and v2, which are references to MVert objects. The list of edges in a Mesh object can be accessed as me.edges.
A MFace object is a like an edge, basically a list of references to the vertices that define it. If we have a MFace object face, this list may be accessed as face.verts.

This jumble of objects containing other objects may be confusing, so keep the previous diagram in mind and let's look at some example code to clarify things. We will define a cube. A cube consists of eight vertices connected by twelve edges. The eight vertices also define the six sides (or faces) of the cube.
from Blender import Mesh,Scene corners=[ (-1,-1,-1), (1,-1,-1), (1,1,-1), (-1,1,-1),(-1,-1, 1), (1,-1, 1), (1,1, 1), (-1,1, 1) ] sides= [ (0,1,2,3), (4,5,6,7), (0,1,5,4), (1,2,6,5), (2,3,7,6), (3,0,4,7) ] me = Mesh.New('Cube') me.verts.extend(corners) me.faces.extend(sides) scn = Scene.GetCurrent() ob = scn.objects.new(me, 'Cube') Window.RedrawAll() We start by defining a list of corners. Each of the eight corners is represented by a tuple of three numbers, its x, y, and z coordinates. Next we define a list of tuples defining the faces of the cube. The sides of a cube are squares so each tuple holds four integers—each integer is an index to the list of corners. It is important to get the order of these indices right: if we would list the first side as (0,1,3,2) we would get a twisted or a bow-tie face.
Now we can define a Mesh object and name it Cube (the highlighted part in the preceding code). As noted earlier, the vertices of a Mesh object are accessible as a list named verts. It has an extend() method that may take a list of tuples representing vertex positions to define additional MVert objects in our Mesh.
Likewise, we can add extra faces to the list of faces of a Mesh object by calling the extend() method of faces with a list of tuples. Because all edges of a cube are edges of the faces there is no need to add any edges separately. This is done automatically when we extend() the list of faces.
The Mesh object that we have defined so far can now be embedded in a Blender object that can be added to the active scene. Note that it is perfectly acceptable to have a Mesh object and a Blender Object with the same name (Cube in this case) because different kind of objects in Blender have separate namespaces. In the Blender GUI, names are always prefixed with a two letter prefix to distinguish them. (for example, LA for a lamp, ME for a mesh, or OB for a Blender object)
When creating Mesh objects a great deal of attention is needed to get all the vertices, edges, and faces added and correctly numbered. This is just the tip of the iceberg when creating meshes. In Chapter 2, Creating and Editing Objects , we will see what hides underwater.
Distributing scripts
In the previous sections, we saw that in order to integrate our script in Blender's menu system and help system we had to place the script in the .blender\scripts directory. A fully integrated script can be a big advantage, but this method has a clear drawback: the person who wants to use this script has to put it in the correct directory. This might be a problem if this person does not know how to locate this directory or does not have the permission to place scripts in that directory. That last problem may be overcome by setting an alternative script directory in the User Preferences, but not everybody might be that tech oriented.
A viable alternative is distributing a script as a text within a .blend file. A .blend file can be saved with the script clearly visible in the main window and one of the first comment lines of the script might read Press ALT-P to start this script. This way, the script can be used by anybody who knows how to open a .blend file.
An additional advantage is that it is easy to bundle extra resources in the same .blend file. For example, a script might use certain materials or textures or you might want to include sample output from your script. The only thing that is very difficult to do is distribute Python modules this way. You can use the import statement to access other text files but this may pose problems (see Appendix B). If you have a lot of code and it is organized in modules, you and your users are probably still better off if you distribute it as a ZIP file with clear instructions on where to unpack this ZIP file.
For Pynodes (or dynamic nodes, see Chapter 7) you don't have a choice. Pynodes can refer to only the Python code contained in text files within a .blend file. This is not really a limitation though as these Pynodes are an integral part of a material, and Blender materials can be distributed only within a .blend file. When these materials are linked to or appended their associated nodes and any texts associated with Pynodes are linked to or appended as well, completely hiding from the end user the way a material is actually implemented.
The Blender API
When developing Python programs in Blender it is important to understand what functionality is provided by the API and even more so, what not. The API basically exposes all data and provides functions for manipulating that data. Additionally, the API provides the developer with functions to draw on the screen and to interact with the user interface and windowing system. What the Blender API does not provide is object-specific functionality besides setting simple properties, especially lacking any functions to manipulate meshes on the level of vertices, edges, or faces other than adding or removing them.
This means that very high-level or complex tasks such as adding a subsurface modifier to a Mesh object or displaying a file selector dialog are as simple as writing a single line of code, while functions as essential and seemingly simple as subdividing an edge or selecting an edge loop are not available. That doesn't mean these tasks cannot be accomplished, but we will have to code them ourselves. So many examples in this book will refer to a module called Tools that we will develop in the next chapters and that will contain useful tools from extruding faces to bridging face loops. Where appropriate and interesting we will highlight the code in this module as well but mainly it is a device to squirrel away any code that might detract us from our goals.
The following sections give a short and very high-level overview of what is available in the Blender API. Many modules and utilities will feature prominently in the next chapters as we will develop practical examples. This overview is meant as a way to help you get started if you want to find out about some functionality and do not know where to look first. It is nowhere near a full documentation of the Blender API. For that, check the most recent version of the API documentation online. You can find the link in the Appendix A Links and Resources .
The Blender module
The Blender module serves as a container for most other modules and provides functionality to access system information and perform general tasks.
For example, information such as the Blender version that you are using can be retrieved with the Get() function:
import Blender version = Blender.Get('version') Incorporating all externally referred files in a .blend file (called packing in Blender) or saving your current Blender session to a .blend file are other examples of functionality implemented in the top-level Blender module:
import Blender Blender.PackAll() Blender.Save('myfile.blend')
Blender objects
Each Blender object type (Object, Mesh, Armature, Lamp, Scene, and so on) has an associated module which is a submodule of the top-level Blender module. Each module supplies functions to create new objects and find objects of a given type by name. Each module also defines a class with the same name that implements the functionality associated with the Blender object.
Note that in Blender, not only the things directly visible in your scene, such as meshes, lamps, or cameras are objects, but also materials, textures, particle systems, and even IPOs, actions, worlds, and scenes.
Many other data items in Blender are not Objects in the Blender sense (you cannot append them from another .blend file or move them about in your scene) but are objects in the Python sense. For example, vertices, edges, and faces within a mesh are implemented as classes: Blender.Mesh.MVert, Blender.Mesh.MEdge, and Blender.Mesh.MFace respectively.
Many modules also have submodules of their own; for example the Blender.Scene module provides access to the rendering context by way of the Blender.Scene.Render module. Among other things, this module defines a RenderData class that allows you to render a still image or animation.
So with what we know now it is possible to draw two slightly different family trees of Blender objects.
The first one illustrates what kind of Blender objects may be contained within or referred to by another Blender object where we limit ourselves to the less abstract objects:

Of course, the diagram above is greatly simplified as we left out some less relevant objects and as it only illustrates a single kind of relationship. There are of course many more types of relationship in a scene, such as parent-child relationships or constraints.
We may contrast the previous diagram with the one that shows in which module a type of object (a class) is defined:

The differences are quite noticeable and are important to keep in mind, especially when looking for specific information in the Blender API documentation. Don't expect to find information on a Curve object in the documentation for the Blender.Object module because a Blender Curve is a specific Blender Object; the Curve class is defined and documented in the Blender.Curve module. In general you can expect the documentation of a class to be in the module of same name.
The bpy module
Besides the Blender module, there is another top-level module called bpy that provides a unified way to access data. It is considered experimental, but it is stable and might be used as a more intuitive way of accessing objects. For example, if we want to access an object called MyObject we normally would do something like this:
import Blender ob = Blender.Object.Get(name='MyObject')
With the bpy module we might rephrase this:
import bpy ob = bpy.data.objects['MyObject']
Likewise, to get access to the active scene object we might write this:
import Blender scene = Blender.Scene.GetCurrent()
Which can be written in an alternative way:
import bpy scene = bpy.data.scenes.active
Which one to prefer is a matter of taste. The bpy module will be the only way to access data in the upcoming Blender 2.5 but the changes in Blender 2.5 go deeper than just this data access so don't be fooled by the superficial similarity of the module name!
Drawing on the screen
Access to Blender's windowing system is provided by the Blender.Draw module. Here you will find classes and functions to define buttons and pop-up menus and ways to interact with the user. The types of graphical elements that you can display using the Draw module are limited to the commonly used ones and customization is not an option.
More advanced functions are provided in the Blender.BGL module that gives you access to virtually all OpenGL functions and constants, allowing you to draw almost anything on screen and to let the user interact in many different ways.
Utilities
Finally, there are a number of modules that encapsulate various functionality that do not fit in any of the previous categories:
-
Blender.Library: Blender allows you to append (that is, import) or link (refer to) objects in another.blendfile. Another way to look at this is that a.blendfile can act as a library where you can store your assets. And because almost anything is an object in Blender, almost any asset can be stored in such a library, be it models, lamps, textures, or even complete scenes. TheBlender.Librarymodule provides script authors the means to access those libraries. -
Blender.MathutilsandBlender.Geometry: These modules contain among other things, theVectorandMatrixclasses with associated functions to apply all sorts of vector algebra to Blender objects. With the functions provided in these modules you will be able to rotate or shear your object's co-ordinates or calculate the angle between two vectors. Many more convenience functions are provided and these will make many surprise appearances in the examples in this book. Don't worry, we will provide explanations where necessary for people not so at home with vector math. -
Blender.Noise: Noise is used in generating all the (apparently) random patterns that form the basis of many of the procedural textures in Blender. This module gives access to the same routines that provide the noise for those textures. This might not only be useful in generating your own textures but might for instance be used in the random placement of objects or implementing a slightly shaky camera path to add realism to your animation. -
Blender.Registry: The data inside scripts, whether local or global, is not stored once a script exits. This can be very inconvenient, for example if you want to save the user preferences for your custom script. TheBlender.Registrymodule provides ways to store and retrieve persistent data. It does not, however, provide any means to store this data on disk, so the persistence is only for the duration of a Blender session. -
Blender.Sys: To quote this module's documentation:This module provides a minimal set of helper functions and data. Its purpose is to avoid the need for the standard Python module
osin specialos.path, though it is only meant for the simplest cases.As we argued earlier, it is generally advisable to install a full Python distribution which among other things includes the
osandos.pathmodules that give you access to a far wider range of functionality. Therefore, we will not use theBlender.sysmodule in this book. -
Blender.Types: This module provides constants that can be used for the type checking of objects. Python's built-in functiontype()returns the type of its argument. This makes it quite easy to check whether an object has a given type when compared to one of the constants in this module.If we would want to make sure an Object is a
Curveobject we could, for example, do it like this:… if type(someobject) == Blender.Types.CurveType : … do things only allowed for Curve objects ...
Summary
In this chapter, we have seen how to extend Blender with a full Python distribution and familiarized ourselves with the built-in editor. This enabled us to write scripts that, although simple, were fully integrated in Blenders scripting menu and help system. We covered many subjects in detail including:
-
What can and cannot be accomplished with Python in Blender
-
How to install a full Python distribution
-
How to use to the built-in editor
-
How to run a Python script
-
How to explore built-in modules
-
How to write a simple script that adds an object to a Blender scene
-
How to register a script in the Blender scripts menu
-
How to document your script in a user-friendly way
-
How to distribute a script
In the next chapter, we take this knowledge a step further to create and edit complex objects and we will see how to define a graphical user interface.
Posted by: tyronestirnaa35465.blogspot.com
Source: https://www.packtpub.com/product/blender-2-49-scripting/9781849510400

Posting Komentar untuk "Blender 2.49 Scripting Pdf Download"